The Collectors are the main point of integration between the external data sources and BravoSearch, so everything that is going to be searchable with BravoSearch needs to have a collector.
The Collector refers both to the section of code that is going out to collect information from the remote location as well as the scheduled task to perform that action.
There are currently file collectors for the following Data Sources:
File Type Scraping Support:
The following types are supported for the extraction of content from files.

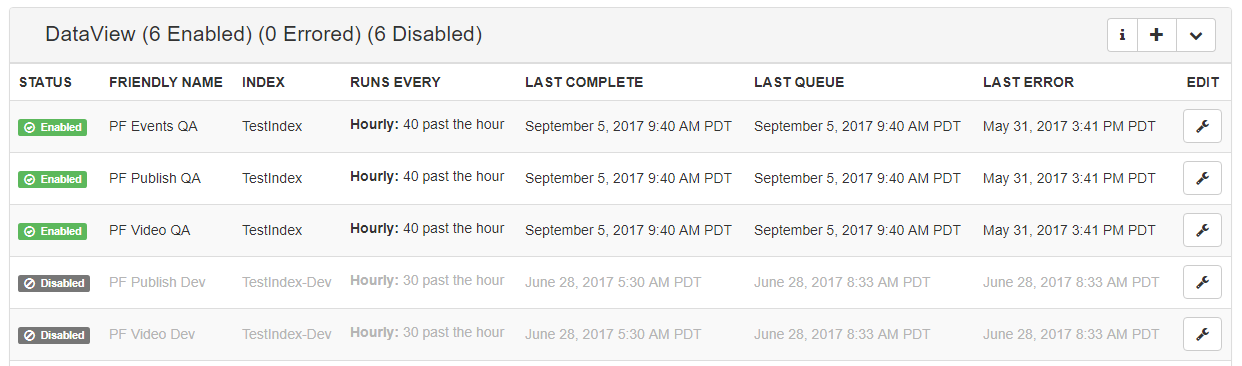
Status - Indicates the current status of the Collector Instance that we are working with. There are currently three states that the Collector Instance can be in:
Friendly Name - The friendly name is an indicator for you, the customer, to help you communicate and differentiate between instances of the search collector.
Runs Every - This is an indicator of how and when the collector should be run, this is configurable from the settings exposed through the edit selection menu.
Last Complete - Indicates the last time that the collector ran to completion. Please note that this number will not update until the collector has completed collection.
Last Queue - Indicates the last time that the collection was queued for execution, generally speaking the queuing of the collection happens then the collection worker will pick up that task as soon as it's available, then once it's complete it will update the Last Complete date stamp.
Last Error - Indicates the last time that the collector failed due to an error, the most common reason that collectors fail is the inaccessibility of the data source.
Warning: Modification of the settings or that adding of settings to the collector can have detrimental effects on BravoCommand, BravoSearch, and the Collecting source. Unless you are absolutely certain of what you are doing it is strongly recommended that you reach out to a BravoSquared representative for help.
To add a collector to the collection process navigate to the heading of the desired collector and click on the plus icon (  ). This will open that Add a Collector dialog that will allow the creation and implementation of the collector.

On the first part of the configuration screen are a couple of options that are used for the initial configuration of the collector:
Friendly Name - The friendly name is a field that has no further application in the product other than to make it easier to reference when discussing it. Many customers will use a patterns of the object that they are collecting and the environment that they are planning to collect that information from (ex. Website Articles - Dev).
Select Index - This is the index that will be populated with this data. In most instances there will only be one option to select from for this process.
Advanced: Maximum Collector Failures - Indicates the number of times that a collector can fail before entering into an errored state.
Advanced: Max Pages - Indicates the maximum number of pages that should be collected, This is helpful in setting finite windows for infinite data sources (ex Logs). Warning: Setting this value too high for large data sets have the opportunity to cause collection runs to wrap which could lead to denial of service against the point where data collection is happening.
Advanced: Start Page - If the source supports paging this indicates the page that we should start indexing.
Advanced: Page Size - If the source supports page sizes this can be helpful in limiting the amount that is pulled from the data source. Warning: Setting the page size too large for data sets that have large objects can cause failures during deserialization and ingestion of the log. This will cause the collector to error out.

The second screen of the Add a Collector dialog is for setting the schedule of the collector. It should be noted that this only schedules the time that the process should be kicked off, the process still needs an open execution slot to operate, if the queue is empty it will kick off every 5 min to look for work.
Options for Collection: All collection times are specified in UTC
Hourly: Indicates that the execution of the collector should be queued at a particular time every hour.
Daily: Indicates that the execution of the collector should be queued at a particular time every day, all times are measured in UTC.
Weekly: Indicates that the execution of the collector should be queued at a particular time every day, all times are measured in UTC
Warning: Do not set all of your collectors to the same time, and be aware of the amount of time that it takes a collector to complete. Failure to take this into account will cause a catastrophic failure in the application. It should also be noted that setting collection of several services located on the same server, can lead to heavy load being placed on that server similar to a denial of service attack.

The next step in the collection process is custom to each of the collectors... for the example in this screen we are including the collection from an API endpoint. Each collector will have their own settings but it's common to have a URL where the content will be located, any special characters or commands that need to be included in the query string, and type information that corresponds to the type from the Indexes Screen.

If the collector that you are working with supports dynamic collection and dynamic mapping you will be presented with a screen that will walk you through the process of mapping out the object in the notation where the left had side of the mapping represents the object as it will appear in the index, and the right hand side of the object will represent the incoming object from the feed.
Warning: Failure to set the mappings correctly or set the base mappings will result in a failure and may result in the index having to be deleted and recreated, proceed with extreme caution.

Modifying a collector is fairly straight forward and follows the same flow as the creation of a collector. To get to the modification menu select the wrench icon from the end of one of the lines inside the collector and select edit.
On the first part of the configuration screen are a couple of options that are used for the initial configuration of the collector:
Friendly Name - The friendly name is a field that has no further application in the product other than to make it easier to reference when discussing it. Many customers will use a patterns of the object that they are collecting and the environment that they are planning to collect that information from (ex. Website Articles - Dev).
Select Index - This is the index that will be populated with this data. In most instances there will only be one option to select from for this process.
Advanced: Maximum Collector Failures - Indicates the number of times that a collector can fail before entering into an errored state.
Advanced: Max Pages - Indicates the maximum number of pages that should be collected, This is helpful in setting finite windows for infinite data sources (ex Logs). Warning: Setting this value too high for large data sets have the opportunity to cause collection runs to wrap which could lead to denial of service against the point where data collection is happening.
Advanced: Start Page - If the source supports paging this indicates the page that we should start indexing.
Advanced: Page Size - If the source supports page sizes this can be helpful in limiting the amount that is pulled from the data source. Warning: Setting the page size too large for data sets that have large objects can cause failures during deserialization and ingestion of the log. This will cause the collector to error out.
The second screen of the Modify a Collector dialog is for setting the schedule of the collector. It should be noted that this only schedules the time that the process should be kicked off, the process still needs an open execution slot to operate, if the queue is empty it will kick off every 5 min to look for work.
Options for Collection: All collection times are specified in UTC
Hourly: Indicates that the execution of the collector should be queued at a particular time every hour.
Daily: Indicates that the execution of the collector should be queued at a particular time every day, all times are measured in UTC.
Weekly: Indicates that the execution of the collector should be queued at a particular time every day, all times are measured in UTC
Warning: Do not set all of your collectors to the same time, and be aware of the amount of time that it takes a collector to complete. Failure to take this into account will cause a catastrophic failure in the application. It should also be noted that setting collection of several services located on the same server, can lead to heavy load being placed on that server similar to a denial of service attack.
The next step in the collection process is custom to each of the collectors... for the example in this screen we are including the collection from an API endpoint. Each collector will have their own settings but it's common to have a URL where the content will be located, any special characters or commands that need to be included in the query string, and type information that corresponds to the type from the Indexes Screen.
If the collector that you are working with supports dynamic collection and dynamic mapping you will be presented with a screen that will walk you through the process of mapping out the object in the notation where the left had side of the mapping represents the object as it will appear in the index, and the right hand side of the object will represent the incoming object from the feed.
Warning: Failure to set the mappings correctly or set the base mappings will result in a failure and may result in the index having to be deleted and recreated, proceed with extreme caution.
You have the option to run all of the collectors in an ad-hoc manner. To do this navigate to the wrench menu and select Run Now. This will now queue the collection of the specified collector at the first available convenience, when a processing slot has opened. As the process gets started the Last Queue Date will updated, once it has run to completion either the Last Complete or Last Error columns will update.
Occasionally for some tasks it may make sense to clone collection tasks, such as in the event of processes that run at different times over a long process. To help quickly facilitate this there is a built in process for cloning collections. To access this option select the wrench menu then click Clone.
From time to time it may make sense to either not collect data, but you still want the data to be available. To achieve this the BravoSearch product allows you to pause the collection of data by selecting the Wrench Menu and Clicking on Disable.
In the event that there is the need to remove a collector from the system you can do so by navigating to the wrench menu and selecting Delete.